DIY Wall Jewelry Holder
I never realized how much jewelry I accept. Until I happened to exist looking for one specific piece. I ended up finding it in my containers of jewelry and discovered long-forgotten pieces as well. I needed to figure out a better solution, one that could display it all. Yes, in that location is plenty of jewelry holders. But I wanted a large ane that could fit on a wall. So, I did what any frequent DIY person would do. Created 1!
 View in gallery
 Materials needed to make a wall jewelry organizer:
- four wood boards
- Miter saw
- white spray paint
- Masonite (compressed cardboard)
- hammer
- nails
- wallpaper/ arts and crafts paper/ wrapping paper
- minor hangers or knobs
- hot gum gun
- labels (optional)
- pocket-size boxes (optional)
How to craft this wall-hanging jewelry organizer:
Step 1: Measure and cut the boards
I purchased four pino boards, that are i.2 inches thick and 3 inches wide. This would allow it to sit every bit flush equally possible against the wall, but yet hold what I needed it to.
First things first were cut the boards down to my desired size. I have a lot of long necklaces, so having a rectangular and long jewelry organizer one was the way to become. The corking thing virtually creating ane from scratch is anyone tin make it as big or little equally needed. Once I had the four pieces cut, I nailed them together in a rectangle shape.
 View in gallery
 Footstep 2: Put together the frame
To create the back, which would agree all of my jewelry I used a small piece of masonite. I did non ant to use something that would make the piece too heavy. It is thin and light, perfect for the job. When information technology was cut I made certain information technology all fit within the frame.
When I was planning out this project I likewise knew I wanted to have some small-scale boxes on the bottom of the box. To hold earrings, broaches, or other accessories. I purchased 4 really pocket-size boxes from a crafts store. They were non treated with anything. Then a quick can of spray paint made these look all shiny and cute.
 View in gallery
 Footstep 3: Spray paint the frame and the boxes
I also spray painted the wood frame white. Having every bit sleek of a look as possible. I wanted this to feel fresh and contemporary.
 View in gallery
 Pace 4: Decorate the backing
Now, it is time to make this jewelry box accept some personality to it. I purchased some wall paper to use as the backing of the jewelry organizer. To add some fun to the modest jewelry boxes I purchased a matching gift handbag.
 View in gallery
 Using a box cutter I cut small rectangles around the pocket-sized box. Then trimmed down until the paper fit inside the boxes. It was such a snug fit I did not fifty-fifty have to glue them in.
 View in gallery
 I besides added some labels I purchased to add a great visual to the small boxes, and to encourage me to keep information technology all organized. I nailed the back to the forest frame to create the jewelry box. Information technology was almost done!
 View in gallery
 Pace 5: Add the niggling knobs
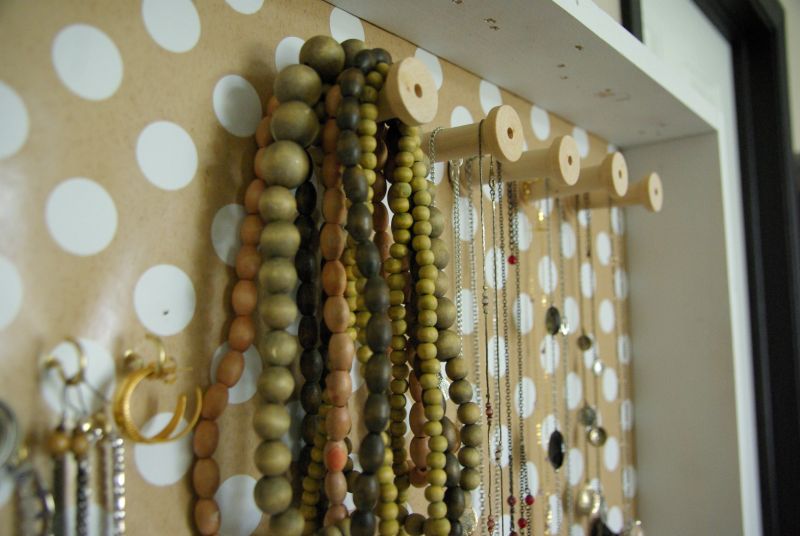
I collected some pocket-sized wood sewing spools, a few hooks, and two cabinet door knobs to employ as hangers for the jewelry. So I started placing them around the box, making sure to suit them in a way to accept my longer pieces have room to hang.
 View in gallery
 With me using wrapping newspaper, information technology is quite thin. Then to insure that there would be no pull from the hangers with the jewelry on information technology. I traced effectually each hanging piece with a knife.
 View in gallery
 This immune a hold to be in place, correct where the spool or other hanging device would be. Then I was able to utilise a hot glue gun, and glue the hanging slice right to the back of the masonite. Making sure this would last me for a while. If you are using material that is thicker, or a painted back information technology should be strong enough on its own. But, wrapping paper tin can rip if there is enough weight on information technology.
 View in gallery
 Step 6: Hang it on the wall
And then, information technology was officially done. I used a few command strips to attach to the back of the jewelry box. This is the easiest fashion to hang things by having adhesives on the back and the wall, where information technology connects. It was fourth dimension to set upwardly and organize my jewelry. I used a long and skinny vase to set on one side, for my watches and other bracelets.
 View in gallery
 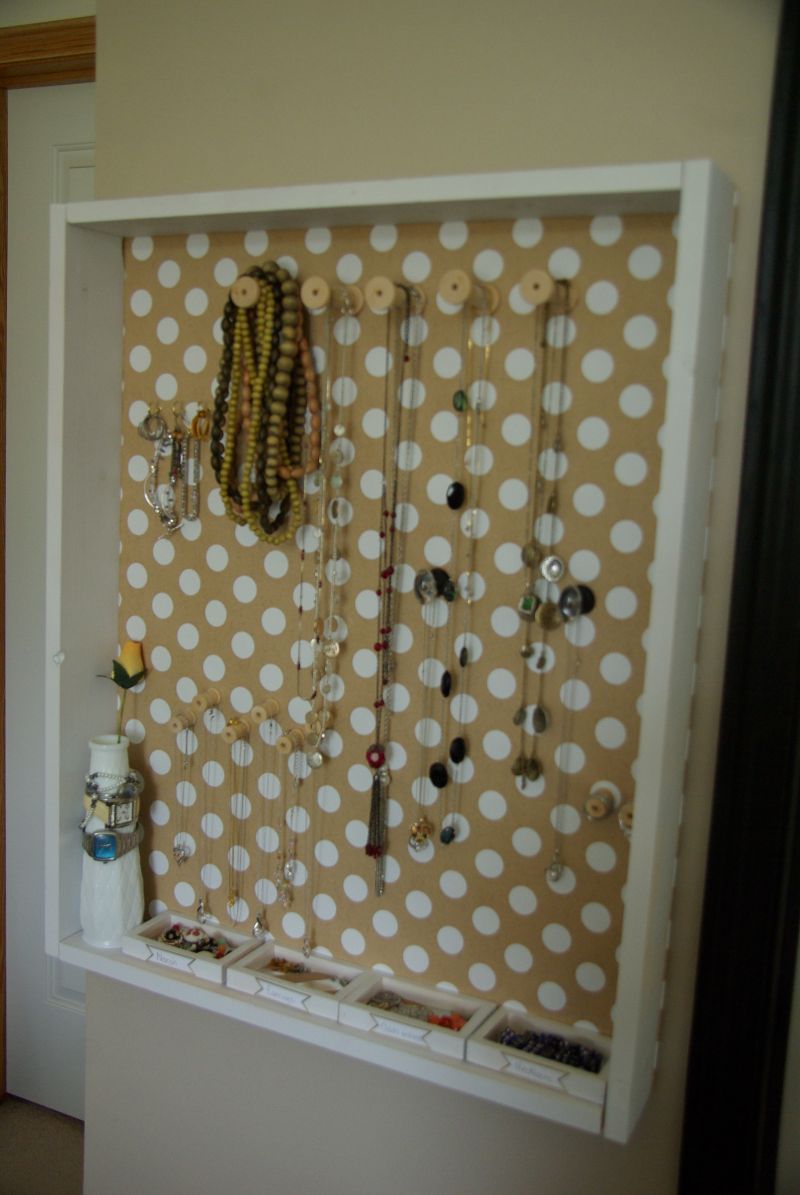 View in gallery
  View in gallery
  View in gallery
 This is something I wish I had done a while ago. It is so organized, easily accessible, and a cute addition to a room or closet also.
 View in gallery
  View in gallery
 Source: https://www.homedit.com/diy-jewelry-holder/
0 Response to "DIY Wall Jewelry Holder"
Post a Comment